11 min read
GUIDE / Backline
How to Read Backline Requirements in a Technical Rider
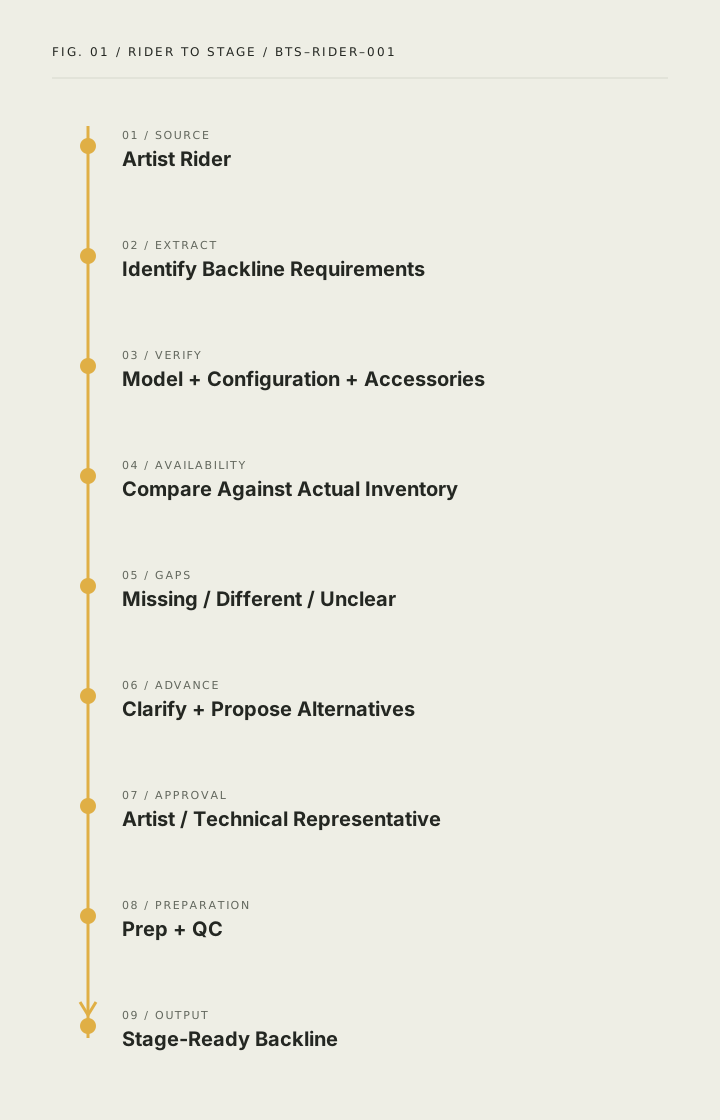
A backline rider should not be treated as a shopping list. Read it as a description of the equipment and setup the musicians expect to perform with. Identify the exact models, configurations, accessories and interfaces; separate firm requirements from preferences; verify availability; document any differences; and have substitutions or unclear requirements approved before show day.
On this page ↓
A practical method for turning an artist's backline rider into an approved equipment plan, covering specification review, hidden requirements, inventory checks, substitutions, stage plots, input lists, preparation and QC.
The objective is not simply to supply equipment with familiar model names. It is to deliver the agreed performance setup.
Start with the production, not the equipment list
Before matching a rider against inventory, understand the production it belongs to.
Ask:
- Which artist is performing?
- What is the band lineup?
- Is this a standalone concert, festival, corporate performance or private show?
- Is the artist touring with any equipment?
- What is being supplied locally?
- Are several artists sharing equipment?
- How much changeover time is available?
- Is the same production travelling between cities?
- Who is the artist's technical contact?
- Who has authority to approve substitutions?
These details change how the same equipment request should be interpreted.
A drum-kit requirement for a standalone concert may allow the entire setup to remain untouched from soundcheck until the performance.
The same requirement at a festival may need to coexist with several other drummers using common shells during short changeovers.
The equipment list may look identical. The production requirement is not.
1. Extract the backline requirements from the complete rider
Technical riders frequently combine several disciplines:
- audio
- monitors
- backline
- stage
- power
- lighting
- video
- communications
- hospitality
Identify the backline requirements, but do not read them in isolation.
A keyboard requirement may interact with:
- DI boxes
- power
- stage position
- monitor requirements
- playback
- audio inputs
A guitar amplifier may interact with:
- microphones
- stage layout
- isolation
- power
- monitor levels
A drum kit interacts with:
- drum microphones
- riser dimensions
- stage plot
- changeover plan
- monitor positioning
2. Read the complete specification, not just the model name
A common mistake is to find the requested brand or model and assume the requirement has been fulfilled.
Consider:
Pearl Reference
That tells us a product family.
It does not necessarily tell us:
- kick-drum size
- rack-tom sizes
- floor-tom sizes
- number of toms
- snare requirement
- cymbal requirement
- pedal
- hi-hat stand
- cymbal stands
- throne
- additional hardware
- preferred setup
Likewise:
Fender Twin Reverb
may look specific, but you should still confirm whether the rider refers to a particular version or whether an approved equivalent is acceptable.
And:
Nord Stage
is incomplete if the artist expects a particular generation, key count or configuration.
3. Break each requirement into components
A useful way to review backline is to decompose every request.
Instead of:
Drum Kit
think:
Shells
- manufacturer/model
- kick
- rack toms
- floor toms
- finish if relevant
Snare
- size
- material/model if specified
Cymbals
- brand
- series
- sizes
- types
Hardware
- hi-hat stand
- cymbal stands
- snare stand
- tom mounts
- pedal
- throne
Additional
- percussion
- electronics
- triggers
- pads
- accessories
The same method works for other instruments.
Guitar rig
Break it into:
- amplifier head or combo
- speaker cabinet
- cabinet configuration
- footswitch
- power
- stand where required
- artist-carried components
Bass rig
Break it into:
- amplifier head
- cabinet
- cabinet size/configuration
- DI arrangement
- power
- accessories
Keyboard setup
Break it into:
- keyboard model
- generation
- key count
- stand
- bench
- sustain pedal
- expression pedal
- power supply
- second tier
- associated mixer/interface where specified
This makes omissions much easier to identify.
4. Distinguish requirements from preferences
Not every line of every rider has the same degree of flexibility.
During the advance, it can be useful to understand requirements conceptually as:
EXACT
The artist expects the specified equipment or configuration unless a change is explicitly approved.
PREFERRED
The requested option is preferred, but suitable alternatives may be considered.
ACCEPTABLE ALTERNATIVE
The rider already identifies approved substitutes.
TO BE CONFIRMED
The requirement is incomplete, ambiguous or dependent on another production decision.
These classifications do not need to appear literally in the artist's rider.
They are a useful way for the production team to understand what still requires action.
5. Look for the requirements hidden between the lines
The largest piece of equipment is often not what causes the problem.
Small missing items can make an otherwise correct setup unusable.
Typical examples include:
- drum throne
- bass-drum pedal
- hi-hat stand
- cymbal stands
- snare stand
- keyboard stand
- second keyboard tier
- sustain pedal
- expression pedal
- keyboard bench
- power supply
- power adapter
- footswitch
- amplifier cabinet
- speaker cable
- mounting hardware
- clamps
- instrument stands
If a rider asks for a keyboard but says nothing about the stand or sustain pedal, that does not automatically mean neither is required.
It means the requirement may need clarification.
6. Check model variants and generations carefully
Product names can hide significant differences.
A keyboard family may have:
- multiple generations
- different key counts
- weighted and semi-weighted versions
- different outputs
- different operating systems
- different sounds or functionality
Amplifier families may have:
- heads
- combos
- different power ratings
- different speaker configurations
- reissues and older versions
Electronic drum equipment may have different:
- modules
- pad configurations
- trigger compatibility
- outputs
- mounting systems
Do not assume that two products sharing a family name are operationally equivalent.
7. Compare the rider against actual inventory
Once the requirement is understood, compare it with what can genuinely be supplied.
For every item, establish:
Available exactly
The requested equipment and configuration are available.
Available with configuration change
The model exists, but something differs.
Alternative available
The exact item is unavailable, but a potentially suitable substitute exists.
Not available
Another solution is required.
Artist carrying
No local supply is required, but interfaces or support may still be needed.
This process should produce a gap list, not just an equipment list.
The gap list is where the real advance work begins.
8. Handle substitutions explicitly
If the exact requested equipment is unavailable, do not quietly replace it with whatever appears closest.
Document:
- what was requested;
- what is unavailable;
- what is being proposed;
- how the proposed equipment differs;
- what remains the same;
- whether approval is required.
For example:
Requested: Keyboard A
Available: Keyboard B
Useful communication explains the relevant difference.
Unhelpful communication says:
Similar keyboard available.
9. Build one clarification list
Technical advances can become inefficient when questions are sent one at a time across multiple conversations.
Instead, consolidate unresolved items.
For example:
DRUMS
1. Please confirm whether cymbals are artist-carried or locally required.
2. Rider specifies double pedal but no preferred model. Please advise.
3. Requested 14-inch floor tom unavailable; 16-inch available. Please confirm acceptance.
GUITAR
4. Please confirm whether amplifier footswitch is required.
5. Requested amplifier unavailable. Proposed alternative attached for approval.
KEYS
6. Please confirm 73-key vs 88-key requirement.
7. Is a keyboard bench required?
8. Sustain pedal will be supplied locally. Please confirm no expression pedal required.
This makes the approval process easier for both sides.
10. Read the stage plot alongside the rider
The equipment list tells you what is required.
The stage plot helps explain where and how it will be used.
Compare:
- performer positions
- keyboard positions
- amplifier positions
- drum position
- percussion
- monitor positions
- microphone positions
- risers
- power requirements
If the written rider and stage plot appear to disagree, clarify the discrepancy.
Do not simply choose whichever document is easier to fulfil.
11. Check the input list too
The audio input list can reveal information missing from the backline section.
For example:
A keyboard listed as:
Keys L Keys R
suggests a stereo audio connection.
A bass channel marked:
Bass DI Bass Mic
suggests both direct and cabinet-microphone paths.
A drum input list can help confirm:
- number of toms
- additional snare
- electronic pads
- percussion
- special instruments
The backline list, stage plot and input list should describe the same performance.
If they don't, something needs clarification.
12. Consider the show format
The same rider may need different execution depending on the production.
Standalone concert
There may be enough time for:
- complete setup
- detailed positioning
- extended soundcheck
- artist-specific equipment throughout the stage
Festival
The same requirements may need to work within:
- shared shells
- shared cabinets
- short changeovers
- multiple stage plots
- limited storage positions
- common hardware
Touring production
The priority may be:
- consistency between cities
- repeatable substitutions
- documented artist preferences
- coordinated local suppliers
Corporate or private performance
Production schedules, venue access and short setup windows may influence preparation.
A rider does not exist independently of the show it belongs to.
13. Translate the approved rider into preparation instructions
Once the requirements and substitutions are agreed, the rider review needs to become something operational.
The preparation team should know:
- exact equipment
- exact configuration
- approved alternatives
- accessories
- artist-carried equipment
- setup notes
- stage position
- special handling
- unresolved items
- QC requirements
This is where a rider stops being a PDF and becomes a production plan.
14. Prepare and QC the equipment
Before dispatch, check the equipment against the approved requirement, not simply the original rider.
That distinction matters if substitutions or clarifications have been agreed.
QC may include, depending on equipment:
- physical condition
- correct configuration
- functional testing
- hardware completeness
- power supplies
- pedals
- stands
- cables
- accessories
- mounting
- firmware/settings where relevant
- labelling
- case contents
15. Confirm the setup before the musician arrives
Where production schedules allow, backline should be assembled and checked before artist soundcheck.
Confirm:
- equipment is present
- configuration is correct
- accessories are present
- agreed substitutions are installed
- stage positions are workable
- interfaces with audio are ready
- power is available
- changeover requirements are understood
Soundcheck should not become the first time the production team discovers what has actually been supplied.
A practical rider-review example
Suppose the rider states:
Pearl Reference drum kit 22 / 10 / 12 / 16 Double pedal 3 cymbal stands Hi-hat stand Throne Cymbals artist carries
A weak interpretation is:
Pearl Reference available.
A useful interpretation is:
Shells
- Pearl Reference
- 22-inch kick
- 10-inch rack tom
- 12-inch rack tom
- 16-inch floor tom
Hardware
- double pedal
- three cymbal stands
- hi-hat stand
- throne
Artist carries
- cymbals
Then ask what remains unclear.
For example:
- Is a snare required locally?
- Is a snare stand required?
- Any preferred double-pedal model?
- Are tom mounts included in the expected configuration?
- Any additional hardware shown on the stage plot?
That is the difference between recognising the equipment and advancing the requirement.
Common rider-review mistakes
Checking availability before understanding the specification
You can only meaningfully check inventory once you know what is actually being requested.
Looking only for exact model names
Configuration and accessories can matter as much as the headline model.
Ignoring the stage plot
Position and context can reveal requirements that the equipment list does not.
Ignoring the input list
Audio inputs often expose missing or conflicting instrument information.
Treating silence as approval
If you proposed a substitution and received no confirmation, do not automatically assume it has been accepted.
Keeping approvals in scattered messages
Important decisions should be consolidated into the final agreed requirement.
Preparing from the original rider after the advance changed it
The warehouse and stage team need the latest approved information.
Waiting until show day to ask questions
Most rider problems are cheaper and easier to solve before the truck leaves.
Related questions
What should I check first in a backline rider?
Start with the artist, lineup and show context, then identify the complete backline requirement before checking individual equipment availability.
Does the exact model on a rider always have to be supplied?
Not necessarily. Some models are strict requirements while others may allow approved alternatives. If the requested item is unavailable, propose the alternative and obtain the appropriate approval rather than assuming it is acceptable.
What if a technical rider is incomplete?
Identify the missing or ambiguous information and consolidate it into a clarification list for the artist or technical representative.
Should I read the stage plot when reviewing backline?
Yes. The stage plot can reveal equipment positions, performer relationships and requirements that are unclear or absent from the equipment list.
Why should I check the audio input list?
The input list can reveal instrument configurations, stereo connections, additional drums, DI requirements and other information relevant to the backline setup.
Who approves a backline substitution?
The appropriate artist representative, musician, production manager or technical contact should approve it according to the production's communication structure.
What should the warehouse prepare from?
The latest approved backline specification, including all confirmed substitutions and clarifications, rather than an outdated original rider.